
Many beginning gardeners think the garden season ends when the first frost arrives. But seasoned growers know a secret: winter can be one of the most productive times in your growing space. While your neighbors’ gardens sit dormant under snow, you can be harvesting crisp, nutritious greens from a simple box on your porch or a dedicated cold frame in your yard. Winter greens aren’t just possible—they’re practical, rewarding, and surprisingly easy to grow. Whether you’re a complete beginner or an experienced gardener looking to extend your harvest, growing greens in winter is an achievable goal that will transform how you think about the gardening calendar.

The key to successful winter gardening lies in understanding that you’re not fighting the season—you’re working with it. Cold hardy greens actually thrive in cooler temperatures, developing sweeter flavors and denser nutrition as they grow slowly through the winter months. This guide will walk you through everything you need to know about winter gardening, from selecting the right varieties to maintaining your plants through the coldest months.
Why Winter Greens Matter for Your Homestead

The case for winter greens extends far beyond the simple joy of fresh salads in January. From a practical homesteading perspective, winter vegetables fill a critical gap in your food preservation strategy. While summer gardens overflow with abundance, winter is traditionally the season when homesteaders rely on preserved foods—canned tomatoes, frozen vegetables, and root crops stored in cool basements. Adding fresh greens to that lineup provides essential nutrients, variety, and psychological comfort during the long, dark months. Growing lettuce in winter means you’re maximizing your garden space year-round. A raised bed that sits empty from November through March represents wasted potential. By shifting to cool-season crops, you’re essentially doubling or tripling your annual productivity from the same physical area. That small investment in season extension techniques pays dividends over time.
Beyond practicality, there’s the nutritional argument. Fresh greens harvested in winter contain different nutrient profiles than summer greens. Cold hardy greens develop higher sugar content and more complex flavors as they slow their growth in response to cool temperatures. Many experienced gardeners report that winter lettuce tastes noticeably better than its summer counterpart—sweeter, more tender, and with more delicate flavors. For beginners, winter greens offer another advantage: lower pest pressure. The insects that plague summer gardens largely disappear or go dormant in winter. You won’t battle aphids, beetles, or caterpillars on your winter lettuce. This means less maintenance, fewer problems, and a higher success rate—making it an ideal season for gardeners just learning their craft.
Choosing Your Growing Method: From Simple Boxes to Advanced Systems
Not all winter gardening requires the same investment or complexity. The beauty of growing greens in winter is that you can start as simply or as elaborately as your homestead allows. Understanding your options helps you choose the approach that fits your goals, climate, and available resources.
The simplest entry point into winter gardening is a box—literally. A basic wooden or plastic container filled with quality potting soil can hold several handfuls of winter greens. Place it against a south-facing wall or window, and you’ll be amazed at what you can grow. This method works best in climates with mild winters or as a supplemental growing space rather than your primary garden. The box retains some heat from the sun’s warmth during the day and provides minimal insulation at night. It’s perfect for beginners, for those with limited space, or for growing microgreens winter varieties that mature quickly.
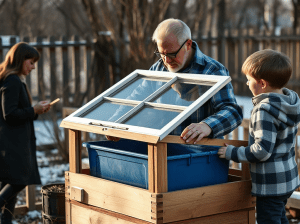
For a slightly more sophisticated version, you can construct a simple cold frame using old windows or clear plastic. A cold frame is essentially a bottomless box with a transparent top that acts like a miniature greenhouse. It’s one of the most effective tools for growing season extension techniques, capturing solar heat during the day and trapping warmth at night. Many experienced gardeners consider a cold frame gardening essential equipment.
If you already have raised beds in your garden, converting one or more to winter production is straightforward. A raised bed winter gardening setup can be as simple as adding a row cover for frost protection, or as involved as building a frame and covering it with clear plastic or old windows. Raised beds offer superior drainage and allow you to control soil quality, both important factors in winter vegetable growing. They also warm up faster in spring sun and cool down more slowly in winter shade compared to in-ground gardens.

For serious winter vegetables growers, investing in a cold frame gardening system or even a low tunnel (a length of PVC pipe covered with plastic) dramatically expands what you can grow and how long you can harvest. These structures can maintain temperatures 10-15°F warmer than the outside air on sunny days, creating microclimates where more tender crops can survive. Some homesteaders even build attached greenhouses or use straw bale construction for additional insulation.
The method you choose depends on your climate zone, available space, and commitment level. But here’s the reassuring truth: even the simplest box will produce greens in winter if you choose the right varieties and provide basic care.
Varieties and Timing: What to Grow and When to
Success in winter gardening hinges on choosing frost-tolerant vegetables and timing your plantings correctly. Not all greens can handle winter cold, but many varieties don’t just survive—they thrive.

Spinach is the gold standard for winter growing. It tolerates hard freezes, actually sweetens after frost exposure, and grows slowly but steadily through winter. Mâche (corn salad) is another exceptional choice—incredibly cold-hardy and capable of producing in nearly any climate. Arugula, despite its reputation as a delicate salad green, grows surprisingly well in winter. Kale varieties, particularly curly kale and lacinato kale, are nearly indestructible in winter conditions. Mustard greens, Asian greens like bok choy and mizuna, and various lettuces labeled as winter varieties all perform well. Growing lettuce in winter works best with specific varieties. ‘Winter Density,’ ‘Buttercrunch,’ and other cold-tolerant cultivars are bred specifically for cool-season production. These varieties germinate and grow at lower temperatures than summer lettuce varieties, making them essential for serious winter production.
Winter crop planning becomes critical. The key to winter gardening success is planting early enough that your greens can establish roots and develop some leaf mass before the deep cold arrives. Depending on your climate, this might mean planting in September or even August. Use your first frost date as a reference point. Most winter greens need to be planted 6-8 weeks before your first expected frost to establish sufficiently. If your first frost arrives October 15th, you’d ideally plant in late August or early September. Spinach and other small seeds can go in even earlier. For gardeners in zones with very cold winters, succession planting becomes a strategy—planting in waves so that some greens mature in early winter while others are just beginning to size up.

The other critical timing factor is day length. Many greens slow dramatically as day length decreases in late fall. This isn’t a problem—it’s actually an advantage. Slow growth means the greens stay tender and don’t bolt. But it does mean you should expect harvests to be smaller and slower during the darkest months compared to fall or early spring. Rather than thinking of winter greens as a single crop, consider it a series of plantings timed to produce throughout the entire cool season. Plant some greens in August for fall harvests, more in September for early winter production, and again in late winter (February in many zones) for early spring abundance. This approach requires more planning but provides remarkably consistent fresh greens.
Care and Maintenance: Keeping Your Winter Greens
Winter greens are more low-maintenance than their summer counterparts, but they still require attention to several key factors: water, light, and temperature management.
Water

The biggest mistake new winter gardeners make is overwatering. In cold weather, plants grow more slowly and use less water. Soil stays moist longer, and waterlogged roots are far more likely to rot in cool conditions. Water when the soil surface feels dry an inch down—often this means watering just once or twice a week rather than daily. On frozen mornings, skip watering entirely and wait for a milder day. In covered growing spaces like cold frames, moisture management becomes even more critical. The enclosed environment can become too humid, promoting fungal diseases. Ventilate your cold frame on mild days—even in winter—to allow excess moisture to escape.
Light
Winter provides less sunlight, but greens don’t need intense light the way fruiting crops do. A minimum of 3-4 hours of direct sunlight is ideal, but many greens will produce in dappled shade or even in bright, indirect light. This flexibility means you can grow winter greens in locations unsuitable for summer gardening. If you’re growing microgreens winter varieties indoors, they can succeed under LED grow lights set on a 12-14 hour timer. This approach gives you complete control over conditions and allows year-round indoor growing if you choose.
Temperature
Here’s where understanding season extension techniques becomes practical. Frost-tolerant vegetables can survive hard freezes, but there’s a difference between surviving (dormant, struggling) and thriving (actively growing). Most winter greens grow best in the 40-60°F range. Below freezing, growth essentially stops. Above 65°F, they may bolt or grow too quickly. This is why protective structures matter. A simple row cover can mean 5-10 degrees of protection. A cold frame can mean 10-15 degrees. These increments make the difference between greens that produce abundant, tender leaves and those that merely survive.
Snow and ice present both challenges and opportunities. A heavy snow load can damage protective structures, but snow also provides excellent insulation. After a snow melts, plants often look refreshed and begin growing again. Ice, however, should be gently removed to prevent damage and disease. Winter’s cold largely eliminates insects, but fungal diseases can become problematic in damp, cold conditions. Ensure adequate air circulation by ventilating cold frames on mild days. Remove any diseased leaves promptly. Avoid overhead watering that leaves foliage wet overnight. These simple practices prevent most winter disease issues.

Slugs and snails can remain active on mild winter days, but their populations are minimal compared to summer. Row covers provide physical protection if they become bothersome. Your winter garden won’t produce the overwhelming abundance of summer, nor should it. Instead, it offers something perhaps more precious: fresh greens when fresh greens are scarce, the satisfaction of growing food during the quiet season, and proof that with knowledge and a bit of planning, your homestead can produce year-round. Start small, learn what works in your specific climate, and expand from there. This winter might be the season your gardening truly becomes a complete, year-round homesteading practice.
Growing winter greens can transform your perception of the growing season. What once seemed like a dormant period becomes an opportunity to expand your harvest, deepen your gardening skills, and provide fresh nutrition during the months when it’s most valuable. Whether you start with a simple box on a sunny windowsill or build a sophisticated cold frame gardening system, the principles remain the same: choose cold hardy greens, time your planting strategically, and provide basic care through the cool months.


